Volvo XC60: Changing a wheel
Removing a wheel
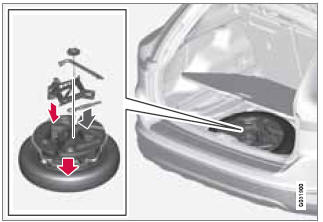
Location of jack, towing eyelet1 and tools
Spare wheel
The spare wheel is only intended for temporary use. Replace it with a normal wheel as soon as possible. The car's handling may be altered by the use of the spare wheel. The correct tire pressure for the spare wheel is stated in the tire pressure table on page 291.
WARNING
Current legislation prohibits the use of the
“Temporary Spare” tire other than as a temporary
replacement for a punctured tire. It
must be replaced as soon as possible by a
standard tire. Road holding and handling
may be affected with the “Temporary
Spare” in use.
CAUTION The vehicle must never be driven with more than one temporary spare wheel.
The spare wheel is located in the spare wheel well with the rim side down. There are two foam blocks, one under the spare wheel and one over/inside. The upper one contains all tools.
The same bolt runs through to secure the spare wheel and the foam blocks.
Taking out the spare wheel
1. Open the floor hatch.
2. Undo the retaining bolt.
3. Lift out the foam block.
4. Lift out the spare wheel.
The other two blocks can remain in the spare wheel well.
After use
The foam block and spare wheel must be replaced in the reverse order. Note the arrow on the upper foam block. It should point forward.
Changing a wheel
1. Apply the parking brake and put the gear selector in P.
2. Take out the jack*, lug wrench*, the towing eyelet and the wheel cover removal tool* stowed under the floor of the trunk.
3. Remove the wheel cover (where applicable) using the removal tool or remove the wheel cover by hand.
4. Block the wheels that are on the ground with wooden blocks or large stones.
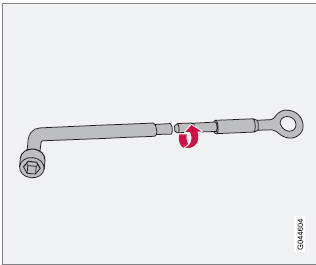
Lug wrench and towing eyelet
5. Screw the towing eyelet into the lug wrench as shown in the illustration.
CAUTION The towing eyelet must be screwed into the lug wrench as far as possible.
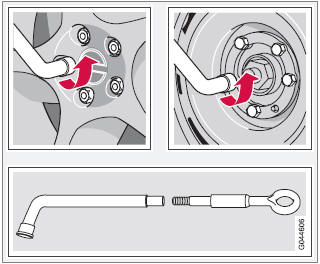
6. With the vehicle still on the ground, use the lug wrench/towing eyelet to loosen the wheel nuts ½ – 1 turn by exerting downward (counterclockwise) pressure.
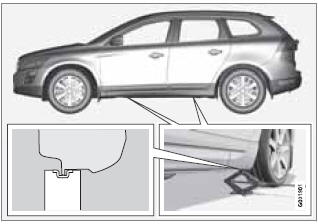 Jack
attachment points
Jack
attachment points
7. There are two jack attachment points on each side of the vehicle. Position the jack correctly in the attachment (see the illustration) and crank while simultaneously guiding the base of the jack to the ground.
The base of the jack must be flat on a level, firm, non-slippery surface. Before raising the vehicle, check that the jack is still correctly positioned in the attachment.
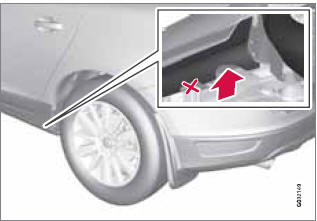
WARNING
There are two attachment points near the
rear of the vehicle. Only the rear-most
attachment point is intended for the jack
(see the illustration).
8. Raise the vehicle until the wheel to be changed is lifted off the ground.
9. Unscrew the wheel nuts completely and remove the wheel.
WARNING
• The jack must correctly engage the jack
attachment.
• Be sure the jack is on a firm, level, nonslippery
surface.
• Never allow any part of your body to be
extended under a vehicle supported by
a jack.
• Use the jack intended for the vehicle
when changing a tire. For any other job,
use stands to support the vehicle.
• Apply the parking brake and put the
gear selector in the Park (P) position.
• Block the wheels standing on the
ground, use rigid wooden blocks or
large stones.
• The jack should be kept well-greased
and clean, and should not be damaged.
• No objects should be placed between
the base of jack and the ground, or
between the jack and the attachment
bar on the vehicle.
Re-installing the wheel
1. Clean the contact surfaces on the wheel and hub.
2. Lift the wheel and place it on the hub.

Tighten the lug nuts
3. Install the wheel nuts and tighten handtight.
Using the lug wrench, tighten crosswise until all nuts are snug.
4. Lower the vehicle to the ground and alternately tighten the bolts crosswise to 103 ft. lbs. (140 Nm).
5. Install the wheel cover (where applicable).
The opening in the wheel cover for the tire's inflation valve must be positioned over the valve.
 Tire Sealing System
See also:
Electronic Brake Control System
Your vehicle is equipped with an advanced electronic
brake control system commonly referred to as ESC. This
system includes Anti-Lock Brake System (ABS), Traction
Control System (TCS), Brake Assist System (BAS), Hill
Start Assist (HSA), Elect ...
Interior lamps
1- Luggage room lamp 2- Room lamp (rear). 3- Map & room lamps (front). 4- Foot
lamps* P. 8-58.
NOTE:
● If you leave the lamps on without running the engine, you will run down the battery.
Before you leave the vehicle, make sure the ...
