Volvo XC60: Rear Seat Entertainment (RSE)
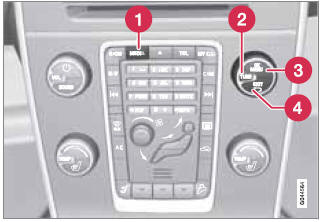
Overview
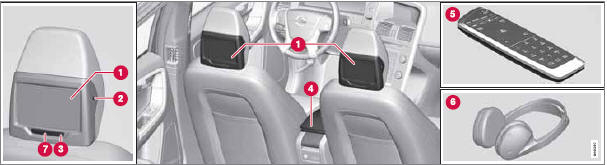
1 Screen: channel A (left), channel B (right)
2 Headphone socket
3 On/Off button
4 A/V-AUX socket
5 Remote control
6 Headphones
7 IR transceiver
Introduction
The RSE system provides entertainment for the rear seat passengers by making it possible to e.g., watch a film, play music, listen to the radio or connect an external device such as a game console.
RSE is fully integrated into the vehicle's infotainment system and can be used at the same time as other infotainment features.
For example, if a rear seat passenger is using A/V-AUX and headphones, the driver and front seat passenger can still use the vehicle's radio or media player. However, only one disc can be played in the media player at a time. You can listen to music from e.g., an iPod® or from streaming audio files using the Bluetooth® function.
The RSE system can be controlled from the front screen (parental control).
Different media can be played or viewed from different sources on the various screens (front center console and/or the respective screens in the rear seat). It is also possible to play or view media from the same source on one or more of the screens. However, it is not possible to play a film from USB while a CD or DVD is being played.
CAUTION
When transporting large objects in the rear
seat, be sure that there is adequate space
between the object(s) and the RSE screens
to help avoid scratching or damaging these
screens.
If necessary, cover the screens with a suitable
material.
NOTE
• The RSE screens and remote control
may not function in very low or very high
cabin temperatures. They will become
operable again after the climate control
system has created a comfortable temperature
in the cabin.
• Keep the IR transceivers' lenses clean
by wiping them regularly with a damp
cloth. A dirty lens could affect the function
of the remote control.
Ignition modes and electrical current to RSE
RSE can be activated with the ignition in modes I or II (and when the engine is running).
See page 82 for detailed information about the various ignition modes. If a film is being played, it will stop momentarily while the engine is being started and will resume when the engine is running.
NOTE
Using RSE for more than approx.
10 minutes when the engine is not running
will drain the vehicle's battery and may
make the engine difficult or impossible to
start.
A message will be displayed on the screen
if the battery's charge level becomes too
low.
Using the system's menus
Selections in the RSE menus are made using the remote control. See page 251 for more information about the RSE menus.
Remote control
A remote control is included with the RSE system, which can be used to control both screens in the rear seat as well as other infotainment system functions.
See page 254 for more detailed information about the remote control.
Cordless headphones
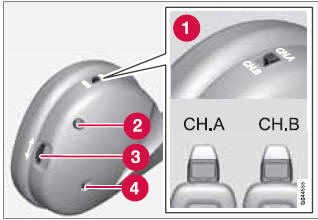
1 Switch for selecting channel A (CH.A) or channel B (CH.B)
2 On/Off button
3 Volume
4 On/Off indicator light
Two sets of cordless headphones are included with the RSE system.
The cordless headphones are activated using the On/Off button (2). The indicator light (4) will illuminate when the headphones are on. Select CH.A (channel A) or CH.B (channel B) with switch (1). Use control (3) to adjust the volume.
NOTE
The headphones will switch off automatically
after approx. 3 minutes if they are not
used.
Replacing batteries in the headphones
The headphones use two AAA batteries.
It is advisable to have extra batteries on hand during long trips.
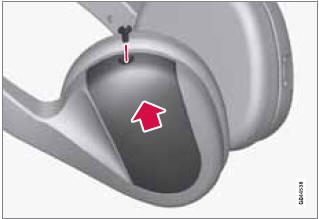
Battery cover and retaining screw
1. Unscrew the retaining screw and remove the battery cover.
2. Remove the old batteries and insert new ones in the directions indicated by the symbols in the battery holder.
3. Put the cover back in place and tighten the retaining screw.
Disposing of old batteries
Worn out batteries should be disposed of in an environmentally responsible manner.
Headphone socket
External headphones can be connected to the 3.5 mm headphone socket on the side of the head restraint (see the illustration on page 245 for the location of this socket). Adjust the volume with the remote control.
A/V-AUX socket, 12-volt socket
This A/V-AUX socket is used to connect external devices to the RSE system. When connecting an external device, always follow the instructions provided with the device. Devices connected through the A/V-AUX socket can use the screens, cordless headphones, the 3.5 mm headphone socket and the infotainment system's speakers.
CAUTION Please be aware that external devices connected through the A/V-AUX socket may cause interference in the RSE system.
Connecting a device to the A/V-AUX socket
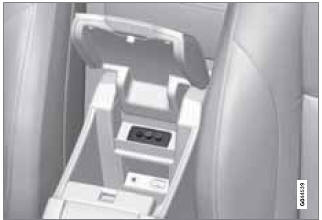
The A/V-AUX socket is located under the center armrest in the tunnel console
1. Connect the device's video cable to the yellow connector.
2. Connect the left audio cable to the white connector and the right audio cable to the red one.
3. If the device is designed to use 12-volt current, connect its power cable to the 12-volt socket (see page 200 for the location of this socket).
Always follow the device's instructions when connecting it to the RSE system.
Audio/video playback through the A/VAUX socket
1. Switch on one of the rear screens by pressing its On/Off button.
2. Use the remote control's  button
to
select a screen (L: left rear screen, F: front
screen, or R: right rear screen). Point the
remote control toward the selected
screen's IR transceiver and press the
button
to
select a screen (L: left rear screen, F: front
screen, or R: right rear screen). Point the
remote control toward the selected
screen's IR transceiver and press the
 button several times to come to A/V
AUX . Release the button and wait several
seconds to confirm your choice.
button several times to come to A/V
AUX . Release the button and wait several
seconds to confirm your choice.
3. Switch on the connected device and press PLAY (or the device's equivalent button).
Input volume
Adjust the input volume in the RSE menu, under A/V AUX input volume.
Activating RSE
The RSE system can be activated using controls on the front or rear screens.
From the front seat, press MEDIA (see the following illustration) and select RSE.
From the rear seat, press the screen's On/Off
button. Use the remote control's
button
to select a screen (L: left rear screen or R: right
rear screen). Point the remote control toward
the selected screen's IR transceiver and continue
by pressing the or  button on
the remote control to select a source such as
Disc, etc.
button on
the remote control to select a source such as
Disc, etc.
Settings made from the front center control panel
1 MEDIA
2 TUNE
3 OK/MENU
4 EXIT
Selecting a source for the rear screens from the front center control panel
An audio/video source for the rear screen(s) can be selected from the front center control panel. The same source can be selected for both rear screens or different sources can be selected for the respective screens.
1. Press MEDIA several times to come to RSE on the front screen. Wait several seconds for your selection to be confirmed.
2. Turn TUNE to select one or both of the rear screens and confirm by pressing OK/ MENU.
3. Turn TUNE to select RADIO, MEDIA (or RSE settings). Press OK/MENU to confirm.
4. Turn TUNE to the desired source (for example, Disc) and confirm by pressing OK/MENU. The selected source will begin playing automatically (if there is a disc in the media player).
Cancel and return by pressing EXIT.
Settings can also be made with the remote control. See page 254 for more detailed information.
Muting
Audio for the rear screens can be muted from
the front center control panel. This function can
be activated under RSE settings
 Mute as
explained in points 2-4 in the section "Selecting
a source for the rear screens from the front
center control panel."
Mute as
explained in points 2-4 in the section "Selecting
a source for the rear screens from the front
center control panel."
Switching off the rear screens
Both of rear screens can be switched off from
the front center control panel. This function can
be activated under RSE settings
Display
off as explained in points 2-4 in the section
"Selecting a source for the rear screens
from the front center control panel" on page
248.
Press one of the remote control's number keys (0 - 9) to switch the screens on again. The screens will also be switched on when the ignition is switched on.
Disabling the remote control (front)
The IR transceiver for the front screen can be switched off, which means that the remote control cannot be used on the front screen.
This function can be activated under RSE
settings
Disable remote control (front) as
explained in points 2-4 in the section "Selecting
a source for the rear screens from the front
center control panel" on page 248.
Rear screen settings
When watching a video file, a pop-up menu can
be displayed by pressing  on the
remote
control. The content of this menu will vary,
depending on the what is being played/viewed.
on the
remote
control. The content of this menu will vary,
depending on the what is being played/viewed.
Day/Night mode
The screens can be set for three different lighting conditions: Auto, Day or Night.
Press on the remote control and
change
the setting under Day/Night mode on the
screen. See also page 251 for additional information
about the RSE menus.
Image settings
Screen settings can be made for brightness, contrast, tint and color.
Press on the remote control and
change
the setting under Image settings on the
screen. See also page 251 for additional information
about the RSE menus.
Screen aspect ratio
Three screen aspect ratios can be set:
Normal, Zoom 1 and Zoom 2.
Normal: The image on the screen is presented at the normal aspect ratio (usually 4:3 or 16:9).
Zoom 1: Full-screen image, but parts of the image will not be viewable.
Zoom 2: Full-screen image, but the aspect ratio will be slightly distorted.
Unless otherwise indicated, the aspect ratio will be Normal.
Press on the remote control and
change
the setting under Aspect ratio on the screen.
See also page 251 for additional information about the RSE menus.
Source menu
The content of each source's pop-up menu will vary, depending on what is being played/ viewed, for example: Disc menu or USB menu. See also page 251 for additional information about the RSE menus.
DVD menu
If a DVD video is being viewed, this selection will appear in the pop-up menu. See also page 251 for additional information about the RSE menus.
Rear screen menu settings
See also page 251 for additional information about the RSE menus.
DivX® Video On Demand
The media player can be registered to play
DivX VOD files from home-burned discs or
USB. The registration code can be found by
pressing the MY CAR button, and going to
Settings
Information
DivX® VOD
code. Go to www.divx.com/vod for additional
information.
USB hub
A USB hub can be connected to the USB socket (see page 229 for additional information).
Music, video and radio
Listening to music
Music from disc tracks/audio files can be played through the media player's USB/AUX sockets or from streaming audio files coming from a Bluetooth®-connected cell phone.
For more information about the media player, see page 225, see page 227 for information about the AUX/USB sockets and see page 230 for information about Bluetooth® media.
1. Switch on the cordless headphones, select CH.A for the left screen or CH.B for the right screen.
2. Use the remote control's button
to
select a screen (L: left rear screen, F: front
screen, or R: right rear screen). Point the
remote control toward a screen's IR transceiver
and press one or more times
to come to the desired source (Disc,
USB, AUX, etc.), release the button and
wait several seconds for your selection to
be accepted.
3. Insert a CD in the infotainment system's media player, or connect an external device to the vehicle's USB/AUX sockets or via Bluetooth®.
Playback and navigating in playlists
Navigate using the remote control's scroll wheel (see the illustration on page 254) to select the desired playlist or folder structure.
Use to confirm the choice of a
sub-folder
or to begin playing the selected track/audio file.
Tracks/audio files can also be played by pressing  on the remote control and change
tracks/audio files by pressing
on the remote control and change
tracks/audio files by pressing  .
.
Stop playback by pressing  .
.
See page 225 for more information about the media player.
Watching a video
Video tracks/files can be viewed via the vehicle's media player or the USB socket.
For more information about the media player, see page 225 or page 227 for information about the USB socket.
1. Switch on the cordless headphones, select CH.A for the left screen or CH.B for the right screen.
2. Use the remote control's button
to
select a screen (L: left rear screen, F: front
screen, or R: right rear screen). Point the
remote control toward a screen's IR transceiver
and press one or more times to
select the desired source (Disc or
USB), release the button and wait several
seconds for your selection to be accepted.
3. Insert a DVD in the infotainment system's media player, or connect an external device to the vehicle's USB socket.
Playback and navigation
Play a video track/video file by pressing
on the remote control and change tracks/video
files by pressing . Stop playback
by pressing . See page 224 for more
information about playback and navigation on
video DVDs and page 225 for information
about playing video files.
Fast forward/reverse
Press and hold the buttons to fast
forward/reverse. Fast forward/reverse can be
done at several speeds for video files by briefly
pressing these buttons to increase the speed.
Fast forward/reverse is done at one speed for
audio files. Stop fast forward/reverse by pressing
, or
the buttons.
Listening to the radio
You can also listen to the infotainment system's radio through the RSE system.
1. Switch on the cordless headphones, select CH.A for the left screen or CH.B for the right screen.
2. Point the remote control toward a screen's
IR transceiver and press one or
more
times to come to the desired source (AM,
FM1, Sirius1*, etc.), release the button
and wait several seconds for your selection
to be accepted.
3. Select a station using one of the preset
buttons (0 - 9) on the remote control or
press to search for the next/
previous available station.
See page 214 for more information about the radio.
RSE menus
IntroductionSettings in the RSE menus can be made from the front center console control panel or by using the remote control in the rear seat. A source for one of the rear screens can be activated from the front center control panel and certain settings for the rear screens can also be made from this panel.
RSE front screen menus
To access this menu, begin by selecting RSE under MEDIA by pressing this button on the front center console (or by using the remote control or the steering wheel keypad). Continue by pressing OK/MENU to access the menu.
Turn TUNE to the desired selection and confirm by pressing OK/MENU.
Settings can be made for the left or right rear screen separately or for both screens (Left RSE screen menu, Right RSE screen menu and Both RSE screen menus):
Power off/Power on
RADIO
MEDIA
RSE settings
Mute
Display off
Disable remote control (front)
Reset all RSE settings
RSE pop-up menu
Press on the remote control
while a video
file is playing to display the pop-up menu. Use
the scroll wheel and the buttons on the remote
to make menu selections. See page 254 for
detailed information about the remote control.
Screen aspect ration
Image settings
Day/Night mode
Source menu
DVD disc menu
RSE rear screen menus
Press on the remote control when
a
source (e.g., Disc) has been selected to access
the RSE-menus for the rear screens.
Use the scroll wheel and the buttons on the remote to make menu selections. See page 254 for detailed information about the remote control.
 Cell phone voice control
See also:
A Word About Your Keys
You can insert the double-sided keys into the locks with
either side up.
Vehicle Key
The authorized dealer that sold you your new vehicle has
the key code numbers for your vehicle locks. These
numbers can be used to order duplicate keys fro ...
Information contained on the tire sidewall
Both U.S. and Canada Federal regulations require tire manufacturers to
place standardized information on the sidewall of all tires. This
information identifies and describes the fundamental characteristics of
the tire and also provides a U.S. DOT ...
