Volvo XC60: Tire Sealing System
Location

Location
Introduction
Certain models are equipped with a tire sealing system* that enables you to temporarily seal a hole in the tread surface and re-inflate a flat tire, or to adjust a tire’s inflation pressure.
The system consists of an air compressor, a container for the sealing compound, wiring to connect the system to the vehicle’s electrical system via one of the 12-volt sockets, and a hose used to connect the system to the tire’s inflation valve.
The 12-volt sockets are located in the front tunnel console, on the rear side of the center console in the rear seat and in the cargo area*, see page 200.
Accessing the tire sealing system
The tire sealing system is stowed under the floor of the cargo area. To access it:
1. Lift the floor hatch in the cargo area.
2. Lift out the tire sealing system.
NOTE
• The tire sealing system is only intended
to seal holes on the tire’s tread area, not
the sidewall.
• Tires with large holes or tears cannot be
repaired with the tire sealing system.
• After use, stow the tire sealing system
properly to help prevent rattling.
WARNING
• After using the tire sealing system, the
vehicle should not be driven farther than
approximately 120 miles (200 km).
• Have the tire inspected by a trained and
qualified Volvo service technician as
soon as possible to determine if it can
be permanently repaired or must be
replaced.
• The vehicle should not be driven faster
than 50 mph (80 km/h) while using a tire
that has been temporarily repaired with
the tire sealing system.
• After using the tire sealing system, drive
carefully and avoid abrupt steering
maneuvers and sudden stops.
Tire sealing system–overview

1 Speed limit sticker
2 On/Off switch
3 Electrical wire
4 Bottle holder (orange cover)
5 Protective hose cover
6 Air release knob
7 Hose
8 Bottle with sealing compound
9 Air pressure gauge
WARNING
Please keep the following points in mind
when using the tire sealing system:
• The sealing compound bottle (no. 8 in
the illustration) contains 1.2-Ethanol
and natural rubber-latex. These substances
are harmful if swallowed.
• The contents of this bottle may cause
allergic skin reactions or otherwise be
potentially harmful to the skin, the central
nervous system, and the eyes.
Precautions:
• Keep out of reach of children.
• Do not ingest the contents.
• Avoid prolonged or repeated contact
with the skin.
• Hands should be washed thoroughly
after handling.
First aid:
• Skin: Wash affected areas of skin with
soap and water. Get medical attention
if symptoms occur.
• Eyes: Flush with plenty of water for least
15 minutes, occasionally lifting the
upper and lower eyelids. Get medical
attention if symptoms occur.
• Inhalation: Move the person to fresh air. If irritation persists, get medical
attention.
NOTE
Do not break the seal on the bottle. This
occurs automatically when the bottle is
screwed into the holder.
Tire sealing system–temporarily repairing a flat tire
Tire sealing system–temporarily repairing a flat tire
Temporarily repairing a flat tire is done in two stages:
• Stage 1: The hole is sealed by pumping sealing compound into the tire. The car is then driven a short distance to distribute the sealing compound in the tire.
NOTE
Do not remove any foreign objects (nails,
etc.) from the tire before using the sealing
system.
• Stage 2: The tire’s inflation pressure is checked and adjusted if necessary.
WARNING
• Never leave the tire sealing system
unattended when it is operating.
• Keep the tire sealing system away from
children.
• Be sure the vehicle is parked safely off
the road and away from moving traffic.
• Apply the parking brake.
Stage 1: Sealing the hole
1. Open the cover on the tire sealing kit.
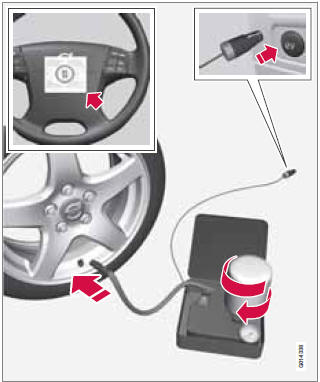
2. Peel off the speed limit sticker and affix it to the steering wheel hub where it will be clearly visible to the driver.
3. Ensure that the on/off switch is in position 0 (the 0 side of the switch should be pressed down).
WARNING
Contact with the sealing compound may
cause skin irritation. If contact occurs, wash
the affected area immediately with soap and
water.
4. Unscrew the orange cover over the bottle holder and unscrew the cap on the bottle of sealing compound.
NOTE
Do not break the seal on the bottle. This
occurs automatically when the bottle is
screwed into the holder.
5. Screw the bottle into the bottle holder.
WARNING
The bottle is equipped with a catch to keep
it securely in place and help prevent sealing
compound leakage. Once in place, the bottle
cannot be unscrewed. This must be done
by a trained and qualified Volvo service
technician.
6. Remove the valve cap from the tire’s inflation valve and screw the tire sealing system’s hose connector onto the valve as tightly as possible by hand.
7. Connect the electrical wire to the nearest 12-volt socket in the vehicle.
8. Start the vehicle’s engine.
WARNING
The vehicle´s engine should be running
when the tire sealing system is used to avoid
battery drain. Therefore, be sure the vehicle
is parked in a well ventilated place, or outdoors,
before using the system.
9. Start the tire sealing system’s compressor by pressing the on/off switch to position I.
WARNING
• Never stand next to the tire being inflated
when the compressor is in operation.
• If cracks, bubbles, etc. form on the tire,
switch off the compressor immediately.
• If there is visible damage to the sidewall
or the rim, the tire cannot be repaired.
The vehicle should not be driven if this
occurs. Contact a towing service or
Volvo On Call Roadside Assistance if
applicable.
NOTE
The air pressure gauge will temporarily
show an increase in pressure to approximately
88 psi (6 bar) while the sealing compound
is being pumped into the tire. The
pressure should return to a normal level
after approximately 30 seconds.
10. Within seven minutes, inflate the tire to between 22—44 psi (1.8—3.0 bar). Switch off the compressor briefly to get a clear reading from the pressure gauge.
CAUTION The compressor should not be used for more than 10 minutes at a time to avoid overheating.
WARNING
If the pressure remains below 22 psi
(1.8 bar) after approximately seven minutes,
turn off the compressor. In this case, the
hole is too large to be sealed and the vehicle
should not be driven.
11. Switch off the compressor and disconnect the electrical wire from the 12-volt socket.
12. Unscrew the hose from the tire’s inflation valve and reinstall the valve cap.
13. Immediately drive the vehicle for approximately 2 miles (3 km) at a maximum speed of 50 mph (80 km/h) to distribute the sealing compound in the tire.
CAUTION
If your vehicle is equipped with the Tire
Pressure Monitoring System (TPMS), the
use of the sealing compound may lead to
incorrect tire pressure readings or in rare
cases, damage to the tire pressure sensor.
Use the tire sealing system to check and
adjust the damaged tire's inflation pressure.
NOTE
• Safely stow the tire sealing system in a
convenient place as it will soon be used
again to check the tire’s inflation pressure.
• The empty bottle of sealing compound
cannot be removed from the bottle
holder. Consult a trained and qualified
Volvo service technician to have the
bottle removed and properly disposed
of.
WARNING
If heavy vibrations, unsteady steering
behavior, or noises should occur while driving,
reduce speed and park the vehicle in a
safe place. Recheck the tire for bumps,
cracks, or other visible damage, and
recheck its inflation pressure. If the pressure
is below 19 psi (1.3 bar), do not continue
driving. Have the vehicle towed to a trained
and qualified Volvo service technician.
Stage 2: Checking inflation pressure
1. Connect the tire sealing system as described in stage 1.
2. Refer to the inflation pressure table in this chapter for the correct inflation pressure. If the tire needs to be inflated, start the tire sealing system’s compressor. If necessary, release air from the tire by turning the air release knob counterclockwise.
CAUTION The compressor should not be used for more than 10 minutes at a time to avoid overheating.
WARNING
If you interrupt your trip for more than 1
hour, check the inflation pressure in the
damaged tire again before continuing.
Replacing the sealing compound container
The sealing compound container must be replaced if:
• the tire sealing system has been used to repair a tire.
• the container’s expiration date has passed (see the date on decal).
NOTE
• After use, the sealing compound bottle,
the hose, and certain other system
components must be replaced. Please
consult your Volvo retailer for replacement
parts.
• If the sealing compound bottle’s expiration
date has passed, please take it to
a Volvo retailer or a recycling station
that can properly dispose of harmful
substances.
Inflating tires
The tire sealing system can be used to inflate the tires. To do so:
1. Park the car in a safe place.
2. The compressor should be switched off.
Ensure that the on/off switch is in position 0 (the 0 side of the switch should be pressed down).
3. Take out the electrical wire and hose.
4. Remove the valve cap from the tire’s inflation valve and screw the hose connector onto the valve as tightly as possible by hand.
5. Connect the electrical wire to the nearest 12-volt socket in the vehicle.
6. Start the vehicle’s engine.
WARNING
• The vehicle’s engine should be running
when the tire sealing system is used to
avoid battery drain. Therefore, be sure
the vehicle is parked in a well ventilated
place, or outdoors, before using the system.
• Children should never be left unattended
in the vehicle when the engine is running.
7. Check the tire’s inflation pressure on the gauge. Switch off the compressor briefly to get a clear reading from the pressure gauge.
8. Refer to the tire inflation table in this chapter for the correct inflation pressure. If the tire needs to be inflated, start the tire sealing system’s compressor (press the on/off switch to position I). If necessary, release air from the tire by turning the air release knob counterclockwise.
CAUTION The compressor should not be used for more than 10 minutes at a time to avoid overheating.
9. Turn off the compressor (press the on/off switch to position 0) when the correct inflation pressure has been reached.
10. Unscrew the hose from the tire’s inflation valve and reinstall the valve cap.
11. Disconnect the electrical wire from the 12-volt socket.
 Temporary Spare
See also:
Remote engine start system (dealer option)
- Do not remote start a vehicle in
an enclosed environment (e.g., in
a closed garage). Prolonged operation
of a motor vehicle in an
enclosed environment can cause
a harmful build-up of Carbon
Monoxide. Carbon Monoxide is
harmful to ...
Media Center 230 (REQ) — AM/FM Stereo Radio And 6–Disc CD/DVD Changer (MP3/WMA
AUX Jack)
NOTE: The radio sales code is located on the lower right
side of the radio faceplate.
Media Center 230 (REQ) ...
