Volvo XC60: Lighting
Lighting panel
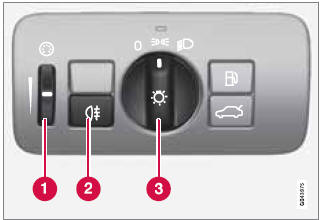
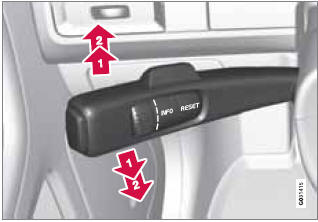
Overview, light switches
1 Thumb wheel for adjusting display and
instrument lighting
2 Rear fog light
3 Headlights/parking lights
Instrument lighting
Illumination of the display and instrument lights will vary, depending on ignition mode.
The display lighting is automatically subdued in darkness and the sensitivity is set with the thumb wheel.
The intensity of the instrument lighting is adjusted with the thumb wheel.
High/low beam headlights
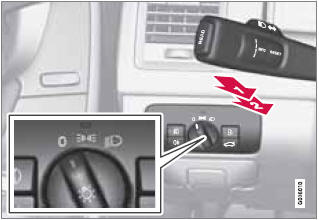
Headlight switch and lever
1 High beam flash
2 Toggle between high and low beams
High beam flash
Move the lever toward the steering wheel to position 1. The high beams come on until the lever is released.
High/low beam headlights
Continuous high beams
1. Set the ignition to mode II.
2. With the light switch in position 0 or
 , pull the turn signal lever toward
the
steering wheel to position 2 to toggle
between high and low beams (this also
applies on models equipped with the
optional Active Bending Lights).
, pull the turn signal lever toward
the
steering wheel to position 2 to toggle
between high and low beams (this also
applies on models equipped with the
optional Active Bending Lights).
> The symbol illuminates in the
instrument panel to indicate that the
high beams are on.
Low beams
When the engine is started, the low beams are
activated automatically (daytime running lights)
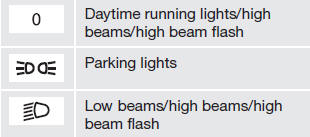
if the headlight control is in position 0 or
.
Daytime running lights can be deactivated in
the MY CAR menu system under Settings
 Car settings
Light settings
Daytime
running lights.
Car settings
Light settings
Daytime
running lights.
However, please be aware that these lights may not be deactivated in Canada.
NOTE
• The use of daytime running lights is
mandatory in Canada.
• Continuous high beams cannot be activated
when the headlight switch is in
position  . High beam flash
will
function in this position.
. High beam flash
will
function in this position.
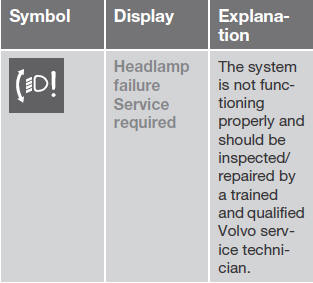
Active Bending Lights (ABL)
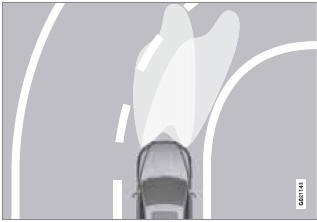
Headlight pattern with the Active Bending Light function deactivated (left)
and activated (right)
When this function is activated, the headlight beams adjust laterally to help light up a curve according to movements of the steering wheel (see the right-pointing beam in the illustration).
ABL is activated automatically when the engine is started.
The function can be deactivated/reactivated in
the MY CAR menu system under My XC60
Active Bending Lights or under Settings
Car settings
Light settings
Active
Bending Lights.
See page 133 for a description of the menu system.
NOTE
This function is only active in twilight or dark
conditions, and only when the vehicle is in
motion.
If a fault should occur in the system, the symbol will illuminate and a message will be displayed as shown in the table.
Parking lights
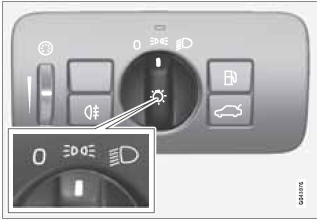
Headlight control in position for parking lights
The parking lights (the license plate lights also come on) can be turned on even when the ignition is switched off.
Turn the headlight control to the center position (the license plate lighting comes on at the same time).
The lighting also comes on when the tailgate is opened in order to alert anyone traveling behind your vehicle.
Rear fog light
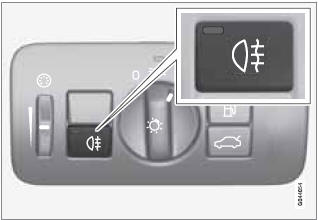
Rear fog light
The single rear fog light is located in the driver's side taillight cluster. The rear fog light will only function in combination with the high/low beam headlights.
Press the button to switch the rear fog light on/off.
> The rear fog light indicator symbol
 on the instrument panel and the
light in the button come on when the
rear fog light is switched on.
on the instrument panel and the
light in the button come on when the
rear fog light is switched on.
NOTE
The rear fog light is considerably brighter
than the normal taillights and should be
used only when conditions such as fog, rain,
snow, smoke or dust reduce visibility for
other vehicles to less than 500 ft.
(150 meters).
Hazard warning flashers
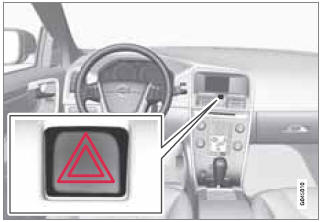
Location of the hazard warning flasher button
The hazard warning flasher should be used to indicate that the vehicle has become a traffic hazard.
To activate the flashers, press the button in the center dash. Press the button again to turn off the flashers.
NOTE
• Regulations regarding the use of the
hazard warning flasher may vary,
depending on where you live.
• The hazard warning flashers will be activated
automatically if an airbag
deploys.
Turn signals
Turn signals
When changing lanes
1 The driver can automatically flash the turn signals 3 times by moving the turn signal lever up or down to the first position and releasing it.
When turning
2 Move the lever as far up or down as possible to start the turn signals. The turn signals will be cancelled automatically by the movement of the steering wheel, or the lever can be returned to its initial position by hand.
NOTE
• This automatic flashing sequence can
be interrupted by immediately moving
the lever in the opposite direction.
• If the turn signal indicator flashes faster
than normal, check for a burned-out
turn signal bulb.
Interior lighting, front
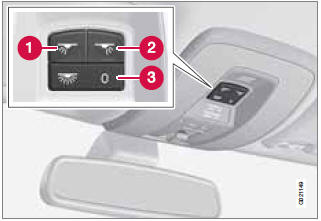
Light switches, front roof lighting
1 Drivers side front reading light, on/off.
2 Passenger's side front reading light, on/off.
3 Overhead courtesy lighting.
The lighting in the front part of the passenger compartment is controlled with the buttons (1) and (2) in the roof console.
Switch (3) has three positions for all passenger compartment lighting:
• Off: right side depressed, automatic lighting off.
• Neutral position: automatic lighting is on.
• On – left side depressed, passenger compartment lighting on.
Interior lighting, rear
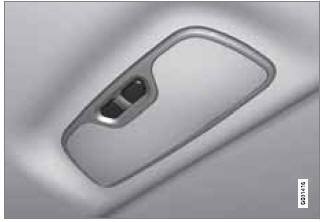
Rear reading lights
The lights are switched on or off by pressing each respective button.
Courtesy lights/door step lighting
The courtesy lights/door step lighting switch on/off automatically when one of the front doors is opened/closed.
Glove compartment lighting
The glove compartment lighting switches on/ off automatically when the lid is opened/ closed.
Overhead courtesy lighting
The passenger compartment lighting is switched on and off automatically when button (3) is in the neutral position.
The lighting comes on and remains on for 30 seconds if:
• the vehicle is unlocked from the outside with the key or remote control.
• the engine is switched off and the ignition is in mode 0.
The lighting switches off when:
• the engine is started
• the vehicle is locked from the outside.
The lighting comes on and remains on for two minutes if one of the doors is open.
The passenger compartment lighting can be switched on and off manually within 30 minutes after the vehicle has been unlocked.
If the lighting is switched on manually and the vehicle is locked, the courtesy lighting will switch off automatically after one minute.
Cargo area lighting
The cargo area lighting comes on automatically when the tailgate is opened.
Home safe lighting
When you leave your vehicle at night, you can make use of the home safe lighting function to illuminate the area in front of the vehicle.
1. Remove the key from the ignition slot.
2. Pull the turn signal lever as far as possible towards the steering wheel and release it.
3. Exit the vehicle and lock the doors.
The headlights, parking lights, turn signals,
lights in the door mirrors, license plate lights,
and footwell lighting will illuminate and remain
on for 30 2, 60 or 90 seconds. The time interval
can be set in MY CAR under Settings
Car
settings
Light settings
Home safe light
duration. See page 133 for a description of
the menu system.
Approach lighting
Approach lighting is activated by pressing the approach light button on the remote key (see the illustration on page 58).
When the function has been activated, the parking lights, indicator lights, door mirror lights, license plate lighting, dome lighting and door step lighting come on.
The time interval for this lighting can be set by
pressing MY CAR and going to Car settings
Light settings
Approach light
duration. See page 133 for a description of
the menu system.
 Steering wheel
See also:
Vehicle loading
Certification Label
As required by National Highway Traffic Safety Administration
regulations, your vehicle has a certification label
affixed to the driver’s side door or B-Pillar.
This label contains the month and year of manufacture,
Gro ...
Pregnant women restraint
WARNING:
● Seat belts work for everyone, including pregnant women. Pregnant women should
use the available seat belts. This will reduce the likelihood of injury to both
the woman and the unborn child. The lap belt should be worn across th ...
